Tuesday, April 13, 2010

mini blueberry kentish puddle puddings?

The word pudding can mean different things depending on where you are. In the UK, they say, pudding could mean dessert, or a sort of pastry which is in no way related to our All-American snack packs of chocolate custard.
English Pudding (or pud, as it is lovingly called by some) was the Daring Bakers challenge for this month. From my understanding, there are a few categories of puddings. You can break it down into sweet and savory or suet crust and sponge cake. I suppose you could categorize my pudding as sweet and with a suet crust, but I am not using suet (which is an animal fat similar to lard or the pieces of fat on uncooked bacon). I actually used butter for my crust, making almost a classic pie crust which is filled, steamed, and unmolded onto a plate. Inside the crust, you can have whatever you like, though I am doing a take on "Kentish Puddle" pudding. Kent being the area of origin; puddle describing the butter, brown sugar and fruit juices that make a little puddle around the unmolded dish. It is similar to a "Sussex Pond" pudding. Traditionally, Sussex Pond puddings have a whole lemon inside which is cooked for so long that it softens and becomes almost candied. To make it Kentish, currants or raisins are usually added. I am lucky enough to have tons of locally grown blueberries in my freezer, so I used them instead.
I based my recipe on this one, though I altered the filling and increased the amount of dough to fit my 3 individual pudding bowls. My filling consisted of cut up lemons (washed and scrubbed to get rid of as much wax and chemical ickiness as possible), blueberries (as many as could fit), and a mixture of 1 tablespoon of butter and 1/4 cup brown sugar, mashed together into a paste. The original recipe uses 2 sticks of butter altogether, which seems a little excessive to me.


I rolled it out and then divided it into 3 pieces. I cut off a third-ish of each peice and made a ball out of each section (six balls), then rolled them out into rounds.
After they each were rolled out, I used them to line the bowls and saved the smaller rounds for the lids. While lining, filling, and topping the puddings, just use your fingers and personal judgement to work out your issues. Patch up holes as you need to and make sure the top bits are secure. You may want to use a drop of water as glue.
(Please note that I filled them a lot more than what you see in the picture)


The recipe explained some complex wrapping of greaseproof paper (what even is that?) and foil so that the top crust would not get soggy from the steam. I was too confused for that so I had to come up with my own methods. First I made a little teepee out of wax paper and covered it in foil to look like this.

They steamed for about an hour in my makeshift steamer of a big pot with a metal strainer and some water boiling underneath.
When I took them out, they were nicely browned on most parts, but there was water on the tops. I unwrapped each pudding and made a giant circle out of parchment paper to place over them while they steamed for another hour.
Here is what they looked like.

To unmold, run a butter knife around the edges, place your serving dish on top of the pudding, and flip them over. Lift up the pudding bowl and voila! Look at all that blueberry lemon goodness.

You can serve the puddings with custard, whipped cream, or just warm, by themselves like I did. Overall, I would say this recipe was a success. I was very surprised that the dough browned in the steamer! It was fun to work with dough for a change, and you should definitely give this recipe a try! I have never tasted a legit pudding, so I am not sure how accurate this is taste-wise.
Anyone from the UK out there who wants to validate for me? :)

xoxo,
allie

Tuesday, March 23, 2010

tiramisu!


This month I decided to participate in the Daring Bakers' Challenge. It is a community of food bloggers who all try an insane recipe and share their experiences. It is my first time partaking, but get ready for a very adventurous recipe every month!
Tiramisu is a layered dessert of ladyfingers soaked in espresso and a mixture of creams and mascarpone cheese. For the challenge we had to make the whole thing. Mascarpone, biscuits, 3 kinds of cream. Everything. I'll tell you about them in the order I made them.

First, I made mascarpone (which is basically cream cheese without the tang). To most people, this seems like an impossible task, but it was surprisingly easy and I will surely do it again soon.
You need 2 cups of heavy whipping cream. The recipe said not to use ultra-pasteurized but I did and it turned out fine. If you can get your hands on fresh, organic, pasteurized cream, use it. In fact, use the freshest and most natural ingredients you can find.
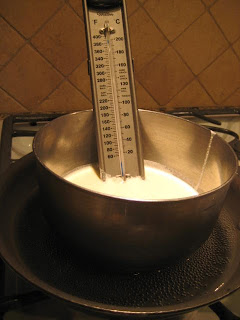
Anyway, in a double boiler/ skillet of water+stainless steel bowl, heat the cream to 190° or until little bubbles just start to come to the surface. They say it should take about 15 minutes. The most important part here is that you stir gently the whole time so that a film doesn't form on top making lumpy cheese. That would be gross. Personally, I stood over the hot cream for 30 minutes as my candy thermometer read 160°.

Finally, I gave up and went on to the next step. Add 1 tablespoon of fresh lemon or lime juice and stir until the cream thickens (this is like curdling without the lumps). Take the bowl off of the stove and let it cool while you set up a mesh strainer lined with cheesecloth over a bowl.

Once cool, pour the cream into the bowl and resist the urge to push it through the strainer with a spoon. Instead, put it in the fridge overnight to let it drain. In the morning, voila! Mascarpone!

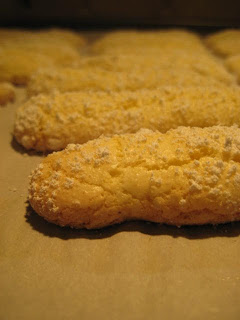
Next were the savoiardi biscuits (a.k.a. ladyfingers). I kinda have a problem calling them lady fingers because some of them really looked like fingers and it weirded me out. But the recipe is really good. It is very similar to macaron batter in the respect that the only liquid comes from eggs. Separate 3 eggs and whip the whites as if you were making meringue of some sort. Add 6 tablespoons of granulated sugar 1 at a time and beat until you get shiny stiff peaks. Break the egg yolks and pour them over the whites. Sift 3/4 cup cake flour over the eggs and mix extremely gently. Don't even mix. Fold. These cookies are known for being light and you do not want to deflate them.
See how fluffy the batter is?
Then put the batter into a piping bag and pipe into "finger" shapes on one or two prepared baking sheets. Sprinkle 3 tablespoons of icing sugar over the cookies and let the sugar moisten. It should look shiny like this after a few minutes.

Then sprinkle another 3 tablespoons of icing sugar on them. This is a lot of sugar.

Tap off as much excess as you can then bake them in a 375° oven for 15 minutes or until they puff up and brown slightly. Let them cool on a rack for a few minutes then save them in an airtight container.

The original recipes can be found here. I am not going to give you the recipes for sabayon and pastry cream here, I will just share my experiences. I made the creams the night before I served the tiramisu. The sabayon/zabaglione is supposed to be flavored with port (making it comically purple). My first batch was pretty alcoholic, so I made one flavored with coffee instead. In the end I used a mixture of the two.


The vanilla pastry cream is pretty straightforward. The only difficult part is stirring so that there are no lumps. That is pretty much the theme of this recipe.

After making 3 batches of creams, I had lots of egg whites leftover (perfect for macarons!)
So if you don't know what do do with your leftover yolks, make some classy pudding!
Later, you mix the mascarpone, pastry cream, sabayon, and whipped cream to make the cream.

Lightly dip the cookies in a mixture of espresso (or just strong coffee) and sugar and line the serving dish with them. Layer cream on cookies on cream on cookies as much as you have room and materials for, ending on a cream layer for the top. Dust on some cocoa and serve! You may want to chill it a while before serving.
Look at those layers!

This was for my sister's birthday.

Obviously, it was a hit.

You really should try this. As time consuming as it was, the concepts were not especially difficult and it was just so impressive.
Come on, I dare you.

xoxo,
allie

Monday, March 8, 2010

Barbapapa!


Barbapapa - Peinture et camouflage
Uploaded by CamDoTv. - Sitcom, sketch, and standup comedy videos.

A cartoon in french which is completely unrelated to baking.
I think it's funny.

xoxo,
allie

Tuesday, January 26, 2010

butter madeleines


A while ago I received a silicon madeleine pan and stashed it far away in a corner somewhere. I just stumbled upon it and thought I should share it's coolness with you! As you can see, it is bright and festive. It brightens my day just looking at it. The coolest part about it is that it is flexible and perfect for popping out fresh and hot cookies. Strangely enough, it has 20 molds instead of the usual dozen. This particular pan yields teeny tiny cookies.

My first (or most memorable) experience with madeleines was at, in my opinion, the best restaurant in Atlanta, Bacchanalia. After being served at least five courses of amazing and fresh food, the waiter asked if we needed anything else. We all said that we could not even imagine there being anything else for them to give us! The waiter replied, "Oh, but there are two more courses!" We all thought he was kidding until a plate of tiny assorted cookies and a tray of fresh butter madeleines were placed in front of us. The buttery smell wafted around our table, and suddenly I had the need to taste one. They were, let me tell you, some of the best cookies of my life. Warm and buttery, with a golden, shell shaped crust, they were caramelized on the outside and like a pound cake on the inside. Absolutely perfect. This is my idea of the perfect madeleine.

This recipe is from 101 cookbooks and can be found here. It features a stick and a half of butter (I know, but it is just so good) and the zest of a lemon, which lends a freshness to the rich cookies. I apologize for the lack of pictures here; I kept saying "I forgot to take a picture of that!" But if you were wondering, I followed the recipe exactly (unlike usual). In my tiny pan, I ended up making about 80 cookies. My french class of four people probably won't finish them. =)
I did end up forgetting to dust them with powdered sugar, but they really didn't even need it. They are best fresh out of the oven, but they held up well all day. I can't vouch for how long they last since mine were eaten the first day. I know that metal pans are on an entirely different level of legitimacy, but silicon works just fine for me. If you want to buy a pan, I probably would recommend a metal one. This is a pretty easy recipe and very rewarding.
Madeleines are perfect for sitting down with a warm cup of something to relax.
Enjoy.

xoxo,
allie

Tuesday, January 12, 2010

not another birthday cake..


My family has always been a little bit out there. From our tastes in music to hobbies to food, we are not exactly traditional. Yesterday, my mom's birthday, I made an alternative to the classic birthday cake. This recipe is stolen from Tartelette, my favorite cooking blog. I highly suggest you all go check out the site. She is creative in the kitchen and takes gorgeous pictures of food. Also, she makes macarons! But today is a break from my favorite cookie to make another almond-based treat. If you have tried making macarons and do not feel the need to ever make them again, I understand. Don't throw away that almond flour! It can be used for hundreds of other recipes which are less frustrating than macarons.

Helene at Tartelette gives two names for these: the original, almond and poached pear cakes that tumble down, and her own name for them, poached pear and almond fallen souffle cakes. The latter sounds more upscale in my opinion, but use whichever you like.

Besides almond flour, these have another unusual ingredient, forelle or seckel pears. They are pretty much the world's cutest mini fruit. If you can't get these where you live, you can use regular pears cut in half lengthwise. My dad is not a fan of pears, so he gets some surprisingly nice looking raspberries on his cake. We try to eat locally and in season as much as possible, but these are what we would call "A++" berries.

First, we are going to poach the pears. For these 2 pears, I am using about 3 cups of water. You want the pears to be pretty much covered except for the stems. Add a quarter of a lemon or lime, a cinnamon stick, a clove, star anise, allspice berry, cardamom pod, or any other spices that aren't in powder form. Also add a quarter cup of sugar to the mixture and bring it to a boil. If you want, peel the pears and core them from the bottom, but leave on the stems (they look beautiful and help with eating them). Place the pears in the liquid and poach them for about 10 minutes or until they are soft. If yours tend to fall over when you cook them, like mine do, just remember to turn them over every once in a while to cook evenly.
These were the seasonings before I added water and a picture of the finished pears.


Set them aside to cool while you prepare the batter. Cream butter and sugar, then beat in an egg. Add vanilla, heavy cream, and flour (of the almond and all-purpose varieties) and mix until smooth. Fill the ramekins about a third of the way and place the pear in the center (or any fruit you choose). Bake them at 350 degrees for about 30 minutes or until they are puffy and golden brown.

When they come out of the oven, dust the cakes with powdered sugar and serve warm. Be sure to cool them for a few minutes, though.

The verdict? Delicious. They are crispy and chewy on the top and have a custard-like center, especially in the raspberry version. These cakes are not super sweet, and a good percentage of the sweetness comes from the fruit. Be sure to choose fruit that is in season to get the sweetest cakes. Stone fruits like peaches and plums could be ideal for the summer. If you like traditional and very sweet desserts, you may want to add more sugar or pick different fillings. These are nice for a small group because you can make individual portions without weeks worth of leftovers. For my mom, they were the perfect birthday cakes.
It was a truly happy birthday.

xoxo,
allie

p.s. the original recipe can be found here

Sunday, January 3, 2010

starbucks macarons?


I recently read on Paris Breakfasts, my favorite blog, about the new "french macaroons" at Starbucks! She has much more experience than me in the legit macaron department, so I trust her judgement. She said that they were too sweet, and were sold at about 3,500 Starbucks stores. With a Starbucks on every corner, I figured I would never find them. The very next day I saw them at a store on Stuart St. in Boston! They come in a box of 12 mini macs with a variety of classic flavors: chocolate, vanilla, coffee, raspberry, lemon, and pistachio.

Apologies that I ate some before taking the picture :)

They are all adorable. The chocolate one had a much more even and chocolatey color than my little speckled ones. I found that it was dense in the middle, like a piece of chocolate cake, and I had a hard time distinguishing the filling from the cookie. Perhaps not being as fresh caused the textural difference.

They were a little too sweet, and the filling was... lacking (but mine is not perfect either, so I can't really judge).
If you can't get to Paris, Japan, LA, or New York City; can't find someone to get them for you, and have little success in the kitchen, these might be worth trying. Keep in mind that they are not exactly the best example of a perfect macaron.
When things are mass-produced, they are just not as good.

xoxo,
allie

Tuesday, December 22, 2009

passion fruit chocolate.


Today I am developing my own recipe for passion fruit chocolate macarons. Since a trip to Hawaii, my family has been in love with the "deliciously sour" distinctive flavor of passion fruit. It would be perfectly accented by the creamy nuttiness of dark chocolate.

To start out, beat the eggs and sugar as usual, but instead of vanilla extract, add a teaspoon of passion fruit concentrate. I got mine from my dad's friend who has a restaurant, but I am sure you can get it online. The directions say to add sugar and water, but there is already enough sugar, and we don't want to dilute the flavor in the batter. We will also add a small bit of red and yellow food coloring.


Then add almond flour and powdered sugar as usual. The adorable measuring cups are courtesy of my sister. Also, we got a new sifter! Mix the ingredients and do the macaronnage. Then pipe the batter onto baking sheets line with parchment or silpats. The batter was a little runny, but breaking them apart should not be a problem. With a small strainer, dust cocoa powder on the cookies before they dry.


As always, heat the oven to 375 and bake the macarons for 15 minutes once they have developed a crust. They look pretty fabulous, if I do say so myself. I tried to make a chocolate passion fruit ganache, but it was difficult and frustrating. I will work on the recipe before posting it here.

xoxo,
allie